Projects

Overview - Projects
DataChain Projects group elements (Connectors, Repositories, Business Entities, DataBlocks, DataLinks, DataAPIs, etc.) and make it possible to organize access to them.
A Project can have multiple versions that share a common identifier. Each version has its own elements and can be used, exported, imported or duplicated. The Project’s metadata, root code, confidentiality, users, permission template and criticality are part of the common envelope shared by all versions. See Settings shared by all versions.
Each Project has a single default version. This is the version that opens by default and whose elements (such as those shared in the Marketplace) are used by default by the Project’s consumers.
The version currently opened by the user is their working version; it may be different from the default version.
The settings and metadata of the current version can be viewed and edited from the Versions tab on the Project editing page.
See Project versioning to create versions, activate them and manage their impact on consumers.
General operation
- General
-
-
The number of projects is not limited
-
A project must have at least one administrator
-
A project has a start and end date (by default, the interval is 100 years)
-
- Main features
-
-
Duplication within the same instance
-
Export for future import
-
Creation from a blank project or an import
-
Creation of a new version by duplication
-
Addition of a new version by import
-
- Users
-
-
The number of members (users or groups) per project is not limited
-
To use DataChain features and create elements, a user must belong to a project or to a group that belongs to a project
-
Users are shared by all versions of a Project
-
- Project roles
-
-
Manager: this role allows users to administer the project and manage its members. This role applies to all versions of a Project and allows users to configure and manage them from the "Versions" tab
-
Member: this role allows users to be added to projects and create elements according to their global permissions
-
 Roles are defined for each user or user group by a user with the Project "Administrator" role.
- Elements
-
-
Each DataChain element belongs to one and only one project
-
- Access
-
Projects can be accessed from GenericsData
 and HandleData
 from the left-hand menu Projects.
The user only sees projects of which they are a member, or projects of which the groups they belong to are members
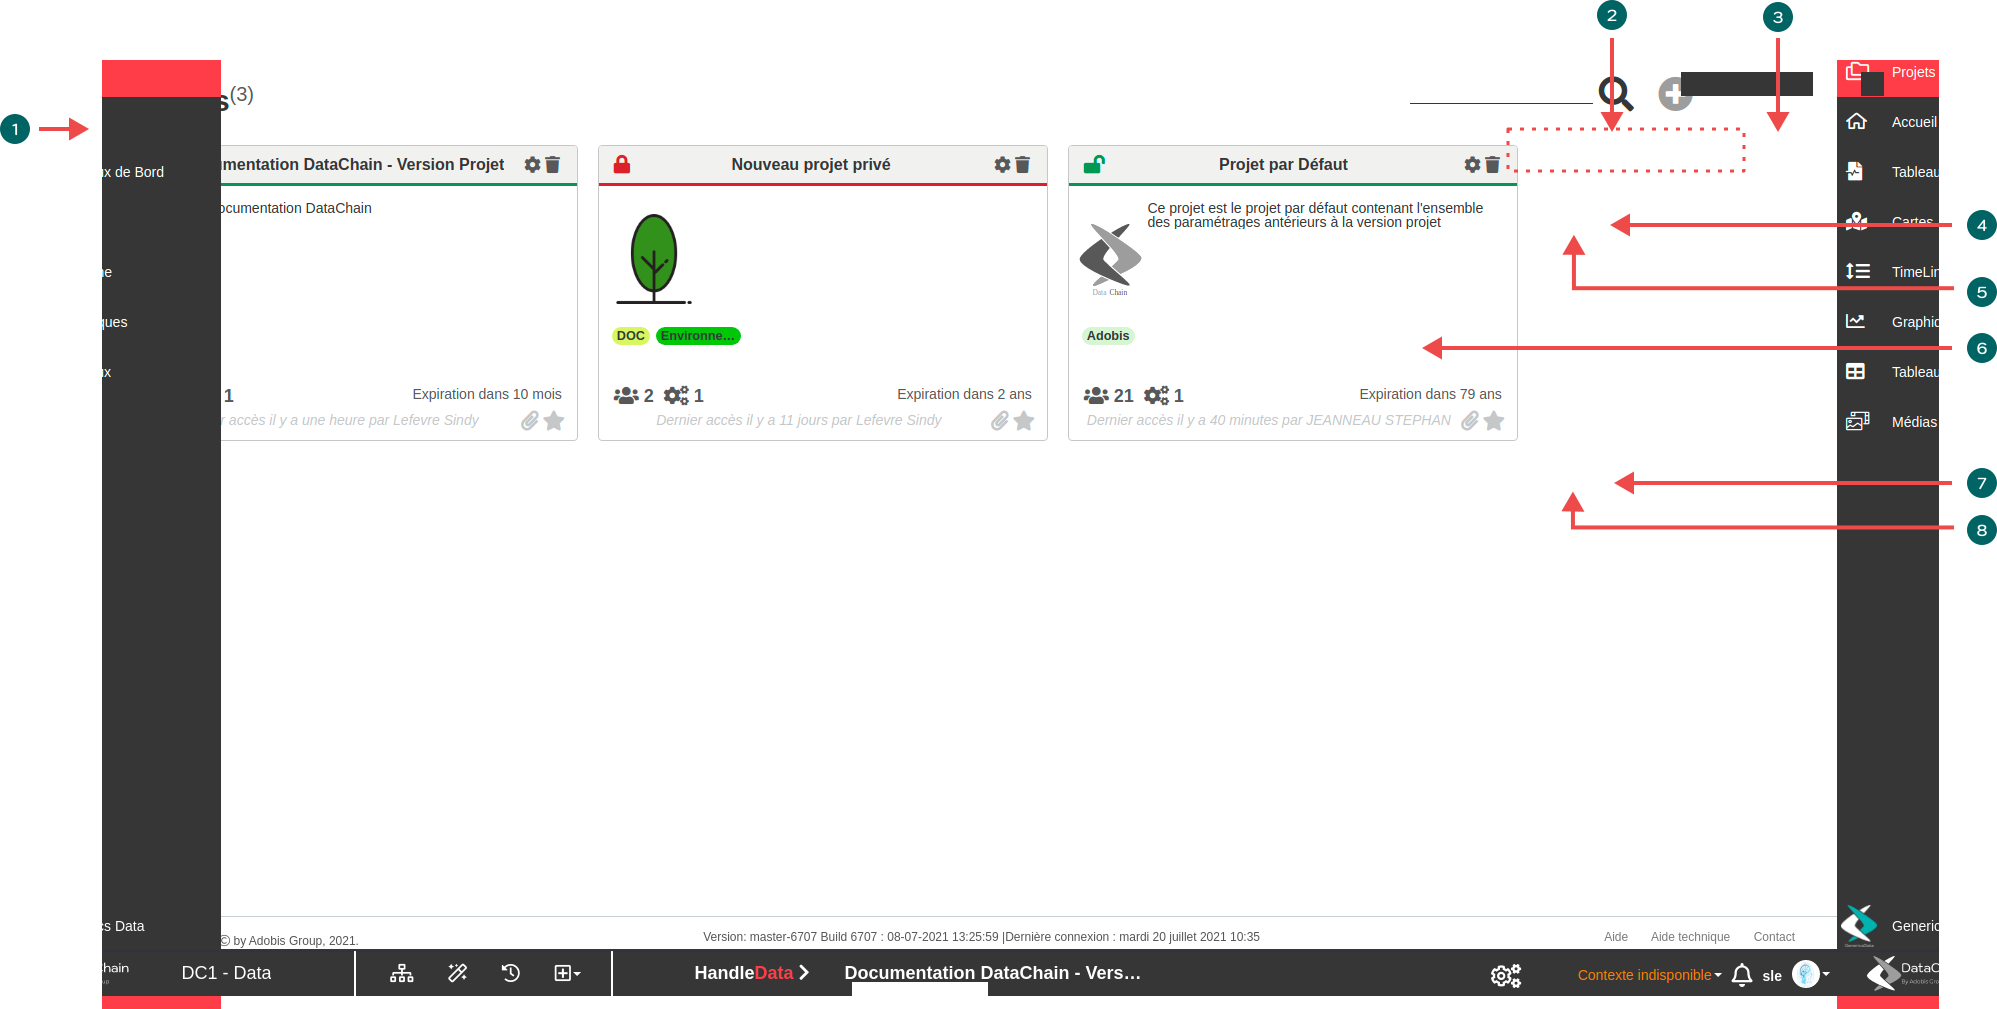
 Access the project list
 Search for a project
 Create a new project (Project Manager role)
 Delete the project (with confirmation)
This icon is only visible to project administrators
 Deleting a project also deletes all the elements it contains
 Modify project settings (Project Manager role)
 Access the project (click the card). Opens the project’s home page and displays project statistics related to the module
 Add the project to favorites
-
-
Several projects can be added to favorites
-
Favorite projects appear at the beginning of the list
-
 Pin the project
-
-
Only one project can be pinned (Default Project)
-
When logging in, the user is automatically redirected to the pinned project’s home page
-
Members and managers
Access to Projects depends on the user’s memberships and those of their groups.
-
A Manager administers the Project, its versions and its members.
-
A Member accesses elements according to their permissions and the rights granted to them.
-
The Project must have at least one Manager.
Global roles are assigned by DataChain administration. See User management and Rights and permissions.
Confidentiality and sharing
The Confidential Project setting controls the sharing of Project metadata with other Projects in the instance. It is shared by all versions.
Data sharing between Projects relies on DataLinks. The concept of a public Project is deprecated in version 9.2.
Access an existing Project
Each project is displayed as a card in the list.
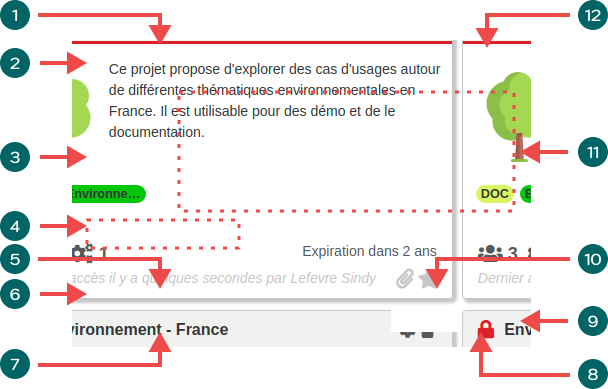
Project title
Previously linked to the concept of a public or private Project and now deprecated
Icon associated with the project
Tag associated with the project
Number of contexts associated with the project
Total number of project members
Information about the last member to access the project
Click to pin the project
 Click to add the project to favorites
 Indicates the approximate expiration date
 Project description
 Project deletion and modification icons (visible only to Project Managers)
To access a project, click its card. The project’s home page is displayed with statistics for the relevant module.
Create a new Project
To create a project, you must have the "Project Creator" role (See the Rights page for more information about DataChain roles).
You can create a blank project or create one by importing a file containing a previously exported DataChain project.
To create a project, select the icon from the left-hand menu, then click the "New" button at the top left of the project list.
Create a blank project
Screen overview
After clicking "New" from the project list, select "Blank project".
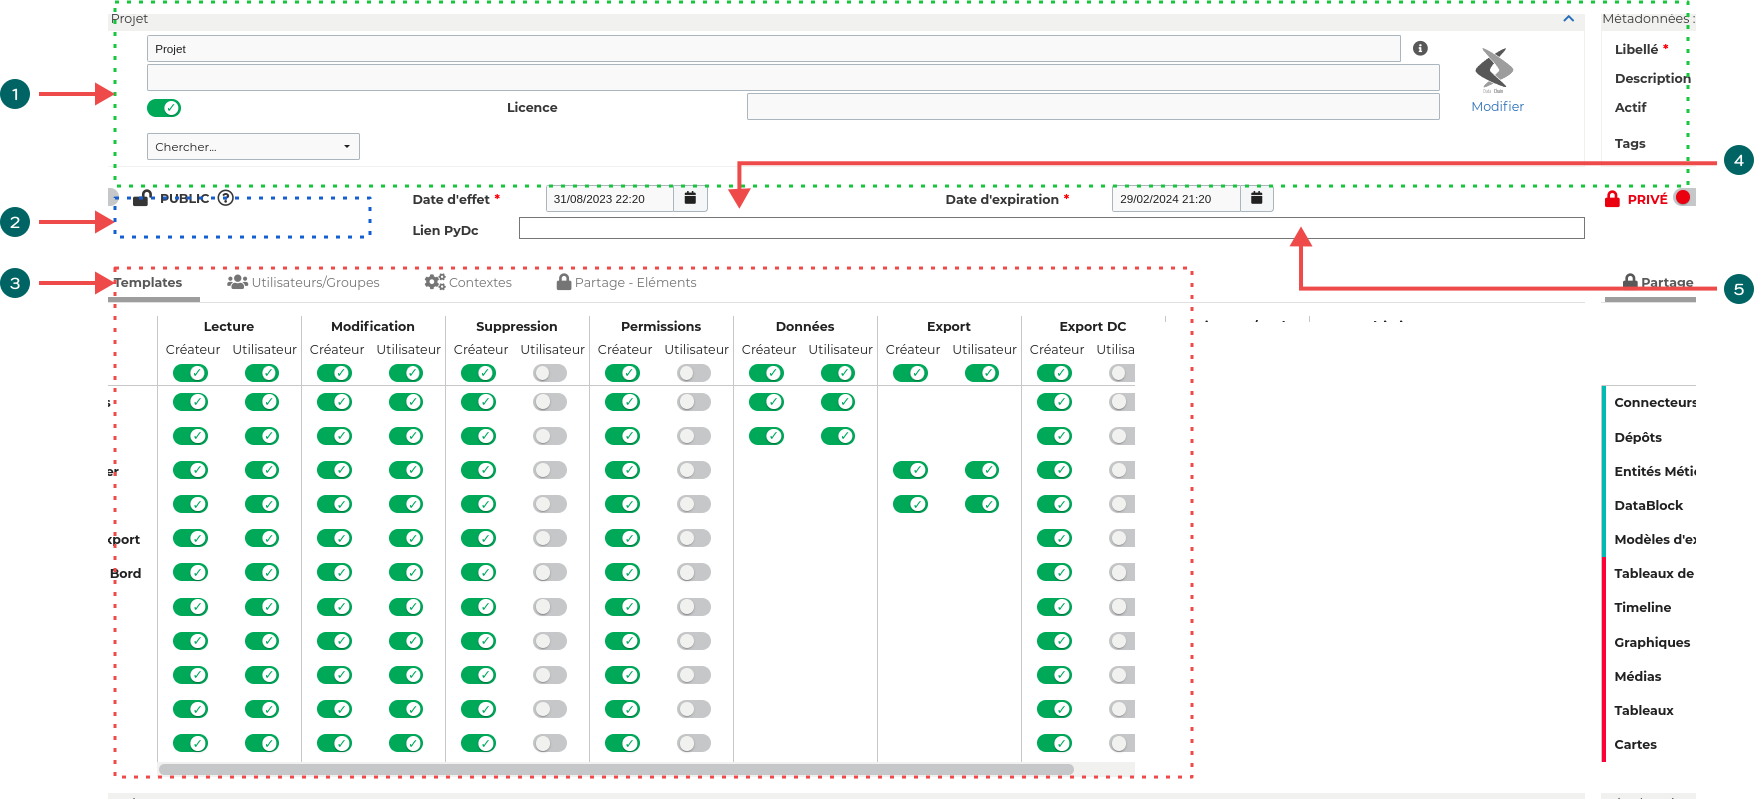
- Metadata
-
-
Entering a label is mandatory
-
Optional fields such as a description, information about the usage license and tags can be used to refine the information associated with a project.
-
Steps for creating a new project
Project start date. Before this date, the project is accessible only to administrators.
Project end date: after this date, the project is revoked.
A revoked project can no longer be deleted
Step 1 | Sharing - Template
The DataChain Template makes it possible to manage rights for each element created within a project, for each action (Read, Modify, Delete, Data, Export).
The Template is shared by all versions of a Project.
Details of each of these actions are available on the Rights page.
Additional settings are available when modifying a project (see the Modify a Project section)
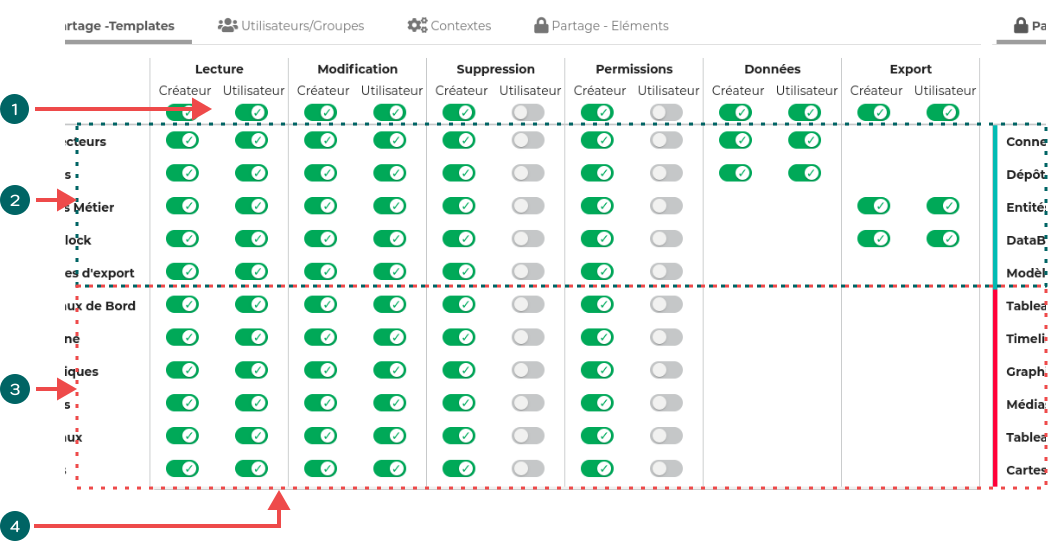
- Enables or disables the entire column for an action and a user type
-
-
Creator: person who created the element
-
User: person consuming the element, whether inside or outside the project
-
Set of rights applied to GenericsData elements
Set of rights applied to HandleData elements
Enables or disables an action for a user type and for a single element type
To proceed to the next step, click  or
 .
Step 2 | Members
Members are shared by all versions of a Project.
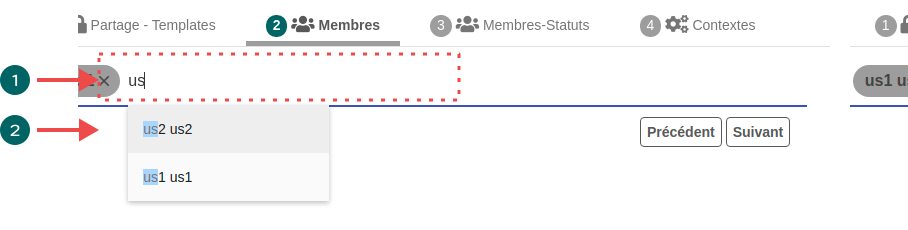
Dynamic search for a DataChain user
- Lists of users matching the current search
-
-
Click to select or press ENTER on the keyboard
-
To proceed to the next step, click  or .
Step 3 | Members and Statuses
To validate project creation, at least one member must be a Manager.

Manager status: the member can access project settings
To be a Project Manager, a DataChain user must have the Manager role (see user role management )
Member status: the member cannot access project settings
To proceed to the next step, click  or .
Step 4 | Version settings
Creating a blank Project also creates its first version.
To validate the creation of this version, at least one context must be enabled for each feature listed in the context configuration table.
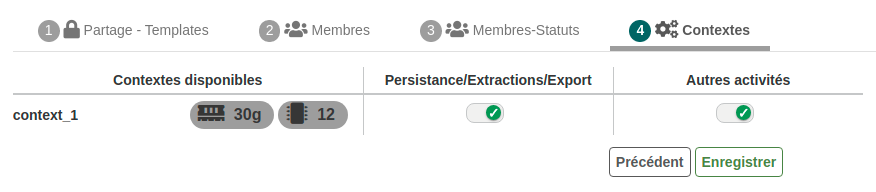
The version can then be named (by default, its version number is "1" if the user does not enter one). A description can also be added to this version.
To proceed to the next step, click the "Advanced settings" tab or .
Step 5 | Advanced settings
Finally, the Advanced settings tab allows you to choose the root code (a label specific to the Project being created that will be inserted into the URLs of its future DataAPIs).
It must be unique (not used by another Project in the instance).
If no value is entered, it is automatically generated (from the next Project code) and assigned.
The "Critical Project" and "Confidential Project" settings can then be unchecked if needed.
When enabled, the Critical Project setting requires the Project deletion to be confirmed by entering a code received by email.
To save, click  .
To return to previous steps, navigate through the tabs or click
 .
Import a project
|
If you import a Project from a version of DataChain Core older than that of the import instance, this may generate inconsistencies in element rights. To limit this risk, we recommend selecting the "Use default template" option and, if necessary, modifying the template after import. |
A project can be created from the file of a previously exported project, provided that it comes from a DataChain instance running a compatible version.
When a Project belonging to the same envelope already exists in the instance, the import can create a version of that Project if the user chooses to do so. The association is determined by the unique identifier of the Project envelope, not by its label.
When importing into an instance different from the export instance, certain data is added to the instance and is therefore visible and accessible to all projects
-
tags (from the metadata of imported elements)
-
classifications (if DataBlocks using classifications in formulas were exported)
After clicking "New" from the project list, select "Import a project".
Step 1 | File selection
Drag and drop or select the file (in .dca format) to import. If the format is valid and the file has not been damaged or corrupted, DataChain starts decompression and a progress bar is displayed.
Step 2 | New project configuration
Depending on the contents of the source project, different options are displayed.
Example of an imported project with a context and members
Label: Editable. By default, the label is the same as that of the source project
By default, the description is identical to that of the source project. This information can be edited after the project is created
Effective date and Expiration date: Editable. By default, the effective date is the current date and time, and the expiration date is 6 months later.
Context: At least one context must be assigned in order to execute the various import-related processes
Rights template
- If the source project template was not exported:
-
-
the option will not be offered and the project will be created with the default template, which can then be modified from the project management page
-
- If the template was exported:
-
-
but not the members: you can choose to use the exported template or the default template. In all cases, the template will be used to create the rights matrix for each element created, for each user or group added to the project
-
along with the members: the template will be added to the project, but will not be applied when creating elements to create the rights matrix. Rights will be transferred from user A to user B based on the user association that has been defined (user or group)
-
Element types: element types that contain no elements cannot be selected. Some elements are automatically selected or deselected depending on the selection of other element types in order to ensure that the data processing chain operates correctly.
Warning: no data can be processed if connectors and repositories are not selected. This can be useful for connecting new sources to a data processing model.
-
Data: Repository extraction and local data are only available if repositories are selected.
DataLink-type repositories depend on the presence of the producer Project of their source DataLinks in the destination instance.
When the DataLink exists in the active version of its producer Project, the imported repositories are automatically linked to it. If it does not exist there, DataChain searches for the most recent version containing this DataLink, based on its creation date.
If the producer Project is absent, a message indicates that the affected repositories will not be populated. When their source is imported later, links that are still unassigned are automatically restored.
Members and groups
By default, the user creating the project is automatically added to the project as a Manager member. This cannot be modified during creation.
-
If members were exported: each profile must be associated. For each exported user or group profile, DataChain checks whether the user or group exists in the instance. If so, it is automatically associated with the source user or group profile (but remains editable). Otherwise, the association must be performed manually. Users can be associated with groups and vice versa. It is recommended to associate profiles with identical roles between the source project and the new project.
If a profile with the project Member role is associated with a profile that does not have this role, the rights matrix applied to elements for that member will not be effective for that user and they will not be able to access the elements.
-
If no members were exported, members (users and groups) must be added manually.
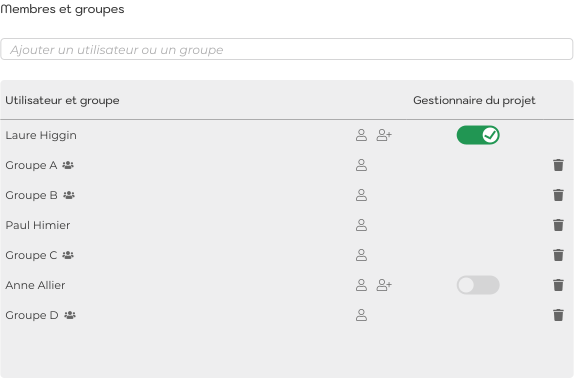
Example of members added to a project
-
In all cases, the project must contain at least one user (or group) with a Member role and one user designated as Manager
If the imported Project includes DataAPIs among the elements selected for import by the user, a second step in the dialog allows the consumers of these APIs in the archive being imported to be mapped to users in the destination instance of the imported Project.
Step 3 | Project creation
Once the project has been correctly configured, click "Create project". The creation process may take some time, depending on the size of the source project and the selected options. Once the project has been created, its configuration can be modified from the project page.
Modify the configuration of an existing Project
To modify a project (rights, expiration date, metadata, root code, confidentiality, criticality, contexts, sharing, members), you must be a Project Manager.
Click the  icon located at the top right of the project card to be modified from the Project list or the Project home page.
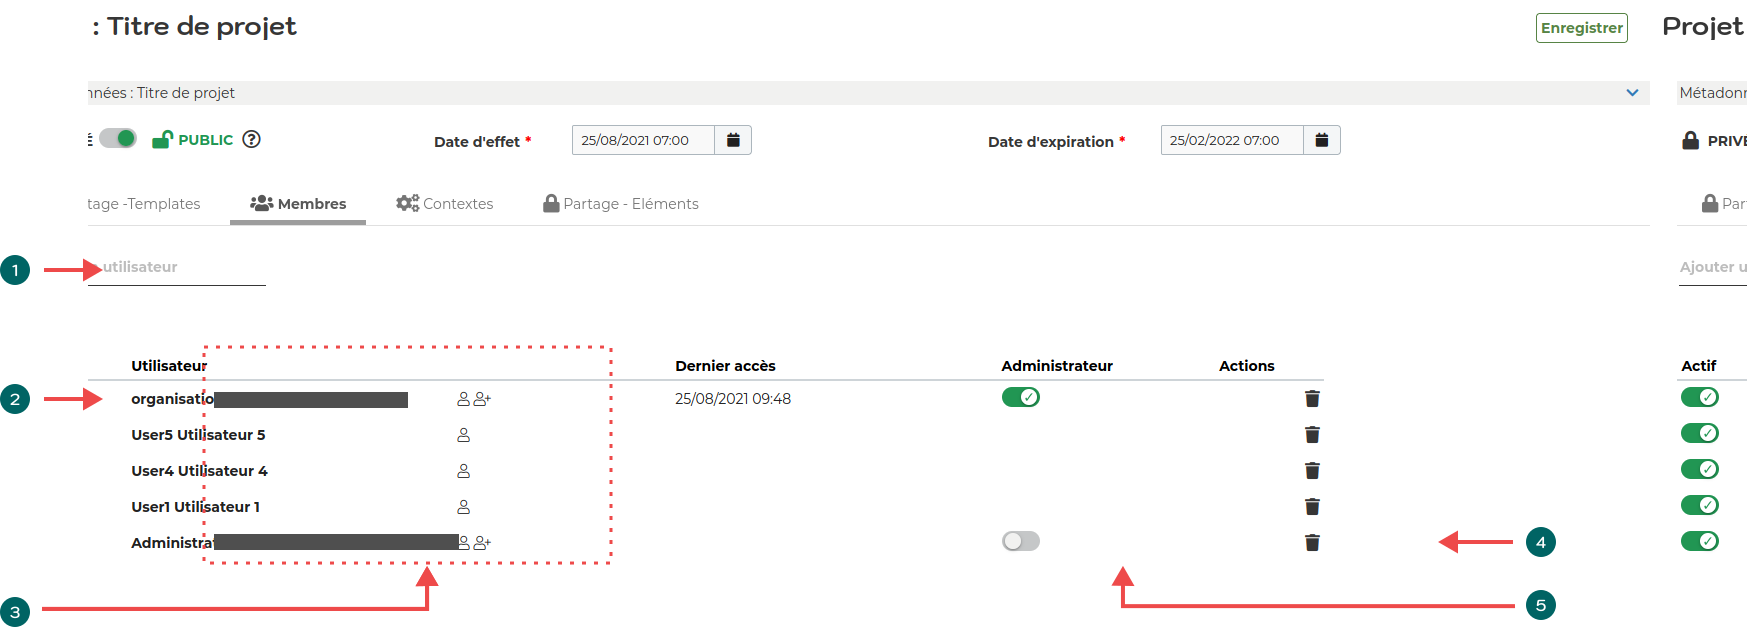
Modify members and managers
-
Add a new member to the project
-
Deactivate a member’s access to the project (the member remains part of the project and can be reactivated)
-
List of project member names and roles
-
Permanently remove a member from the project
-
Enable or disable the administrator role for the member
Rights template
Additional settings are available when modifying a project in the Template tab
-
DC Export
-
Persistence/Cache
-
Characteristics
-
Export traceability
-
Extraction
-
Link
|
Note on modifying the rights template If the template is modified, this does not modify the existing rights matrix on project elements for current users. This action will only affect new users added after the template is modified, for all existing elements. For each element created after the template has been modified, the new template will be applied to create the rights matrix associated with each project member (group or individual user). |
Advanced settings
When a Project is created, a root code is automatically generated.
This code is used to access shared resources such as DataAPIs.
| When you modify this code, all URLs of shared elements (API) will be updated when the API publication is updated. |
The root code, criticality and Confidential Project settings are shared by all versions of the Project.
Criticality requires entering a code sent by email to confirm deletion of the Project.
Saving a modification to these settings immediately applies it to all versions. When importing or duplicating a version into the Project, the existing settings are reused and cannot be modified in the creation form.
Email template
When actions are performed on published dashboards, emails are sent to consumer users.
Relevant actions
-
Expiration date modified
-
Dashboard published or updated
The message title and body can be customized for each of these actions using variables
-
Publication link: $publicationLink
-
Publication date: $publicationDate
-
Expiration date: $publicationExpirationDate
-
Publication title: $publicationTitle
-
Dashboard title: $dashboardTitle
Export a project
Project export extracts the selected content of the current Project’s working version in .dca format. It does not include all versions and does not automatically select the active version.
Before starting the export, check the version opened in the DataChain top menu.
Each Project export generates a trace, accessible from the GenericsData left-hand menu under "Export traceability", in the "Project" tab.
For each export, and depending on the rights of the logged-in user, the exported Project file can be downloaded.
Warning, the user performing the project export is solely responsible for the security of the data it contains. Under no circumstances may Adobis Group be held liable for any loss, alteration or use that may be made of it.
Some elements are not included in the export
-
dashboard publications
-
element referencing in the DataCatalogue
Other DataChain elements are automatically added during export, depending on the exported content
-
Classifications: if they are used in DataBlock formulas and the DataBlocks are exported
-
Tags: if they have been added to the metadata of exported elements
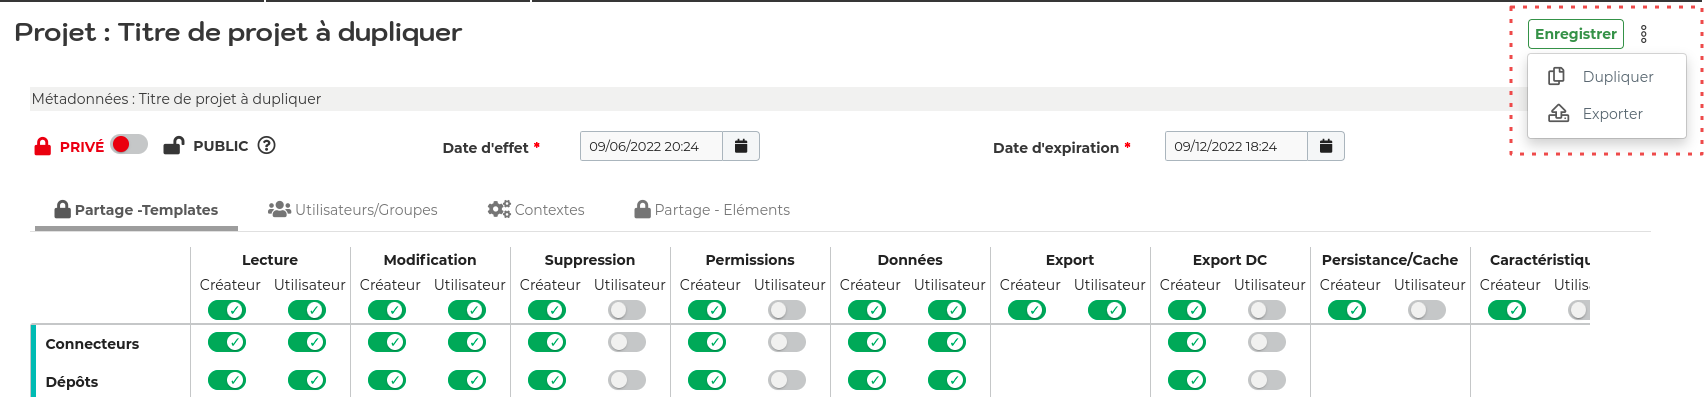
A project can be exported from the project configuration screen: click the right-hand menu, then click "Export".
Step 1 - Analysis of the project to export
A preliminary step is automatically performed by DataChain to check that the project can be exported.
Step 2 - Export configuration
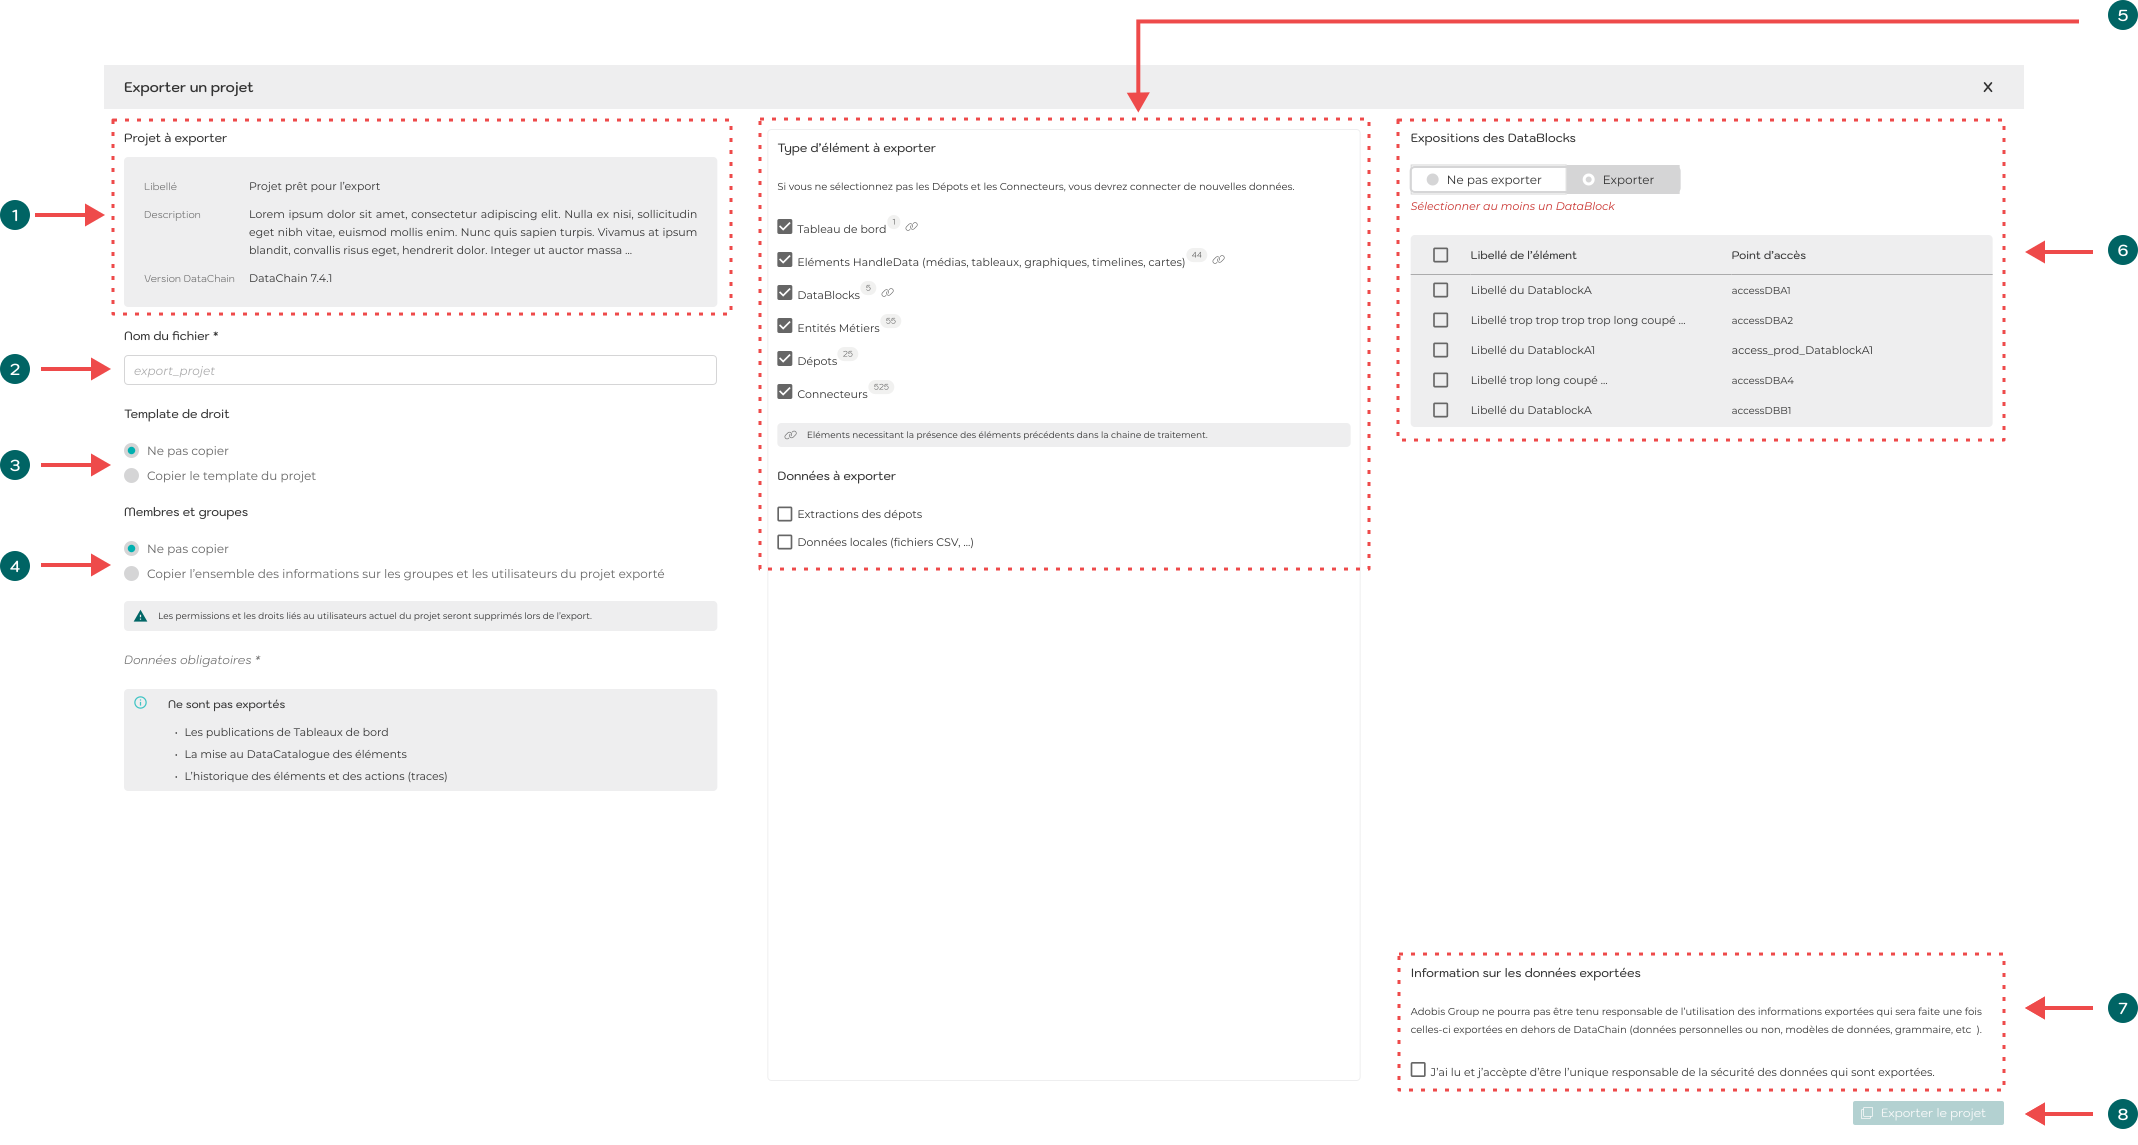
Information area about the data to export
Selection of the file name in which the exported project will be compressed
Specifies whether the template defined in the project should be copied.
The template is used when importing the project only when the references of project members were not exported, in order to create the rights matrix for the elements
Specifies whether project member references (users and groups) are added to the export
If members are added to the export and the project is imported into an instance that does not have the same members, each profile must be manually associated with an existing profile in the import instance
Specifies the element types and related data added to the export.
Those that contain no elements cannot be selected. Some elements are automatically selected or deselected depending on the selection of other element types in order to ensure that the data processing chain operates correctly.
Repository extraction and local data are only available if repositories are selected.
This element refers to V1 Exposures, which are now deprecated and replaced by DataAPIs
User consent is mandatory regarding responsibility for the data. Their profile will be associated with the export to ensure data traceability
Step 3 - Project export
Once the project export has been correctly configured, click "Export project"
Note that any elements created, modified or deleted after the procedure starts are not taken into account.
The export process may take some time, depending on the size of the source project and the selected options.
If the export completes successfully, an email containing the link to download the file is sent to the user who started the project export as soon as the file is ready (the email may be in the spam folder).
Otherwise, if an error is encountered during the process, an informational email is sent to the user.
Duplicate a project
A project can be duplicated (that is, all the DataChain elements it contains and its settings) within the same DataChain instance.
Duplicating a Project creates a new independent Project from the working version and selected content.
To add a version to the same Project, use New version.
External sources are not copied with the Project. Check their references and access in the created Project.
Some elements are not included in duplication * project members * dashboard publications * element referencing in the DataCatalogue
From the configuration screen of the project to be duplicated, click the right-hand menu, then click "Duplicate".
Step 1 - Analysis of the existing project
A preliminary step is automatically performed by DataChain to check that the project can be duplicated.
Step 2 - New project configuration
Depending on the contents of the source project, different options are displayed.
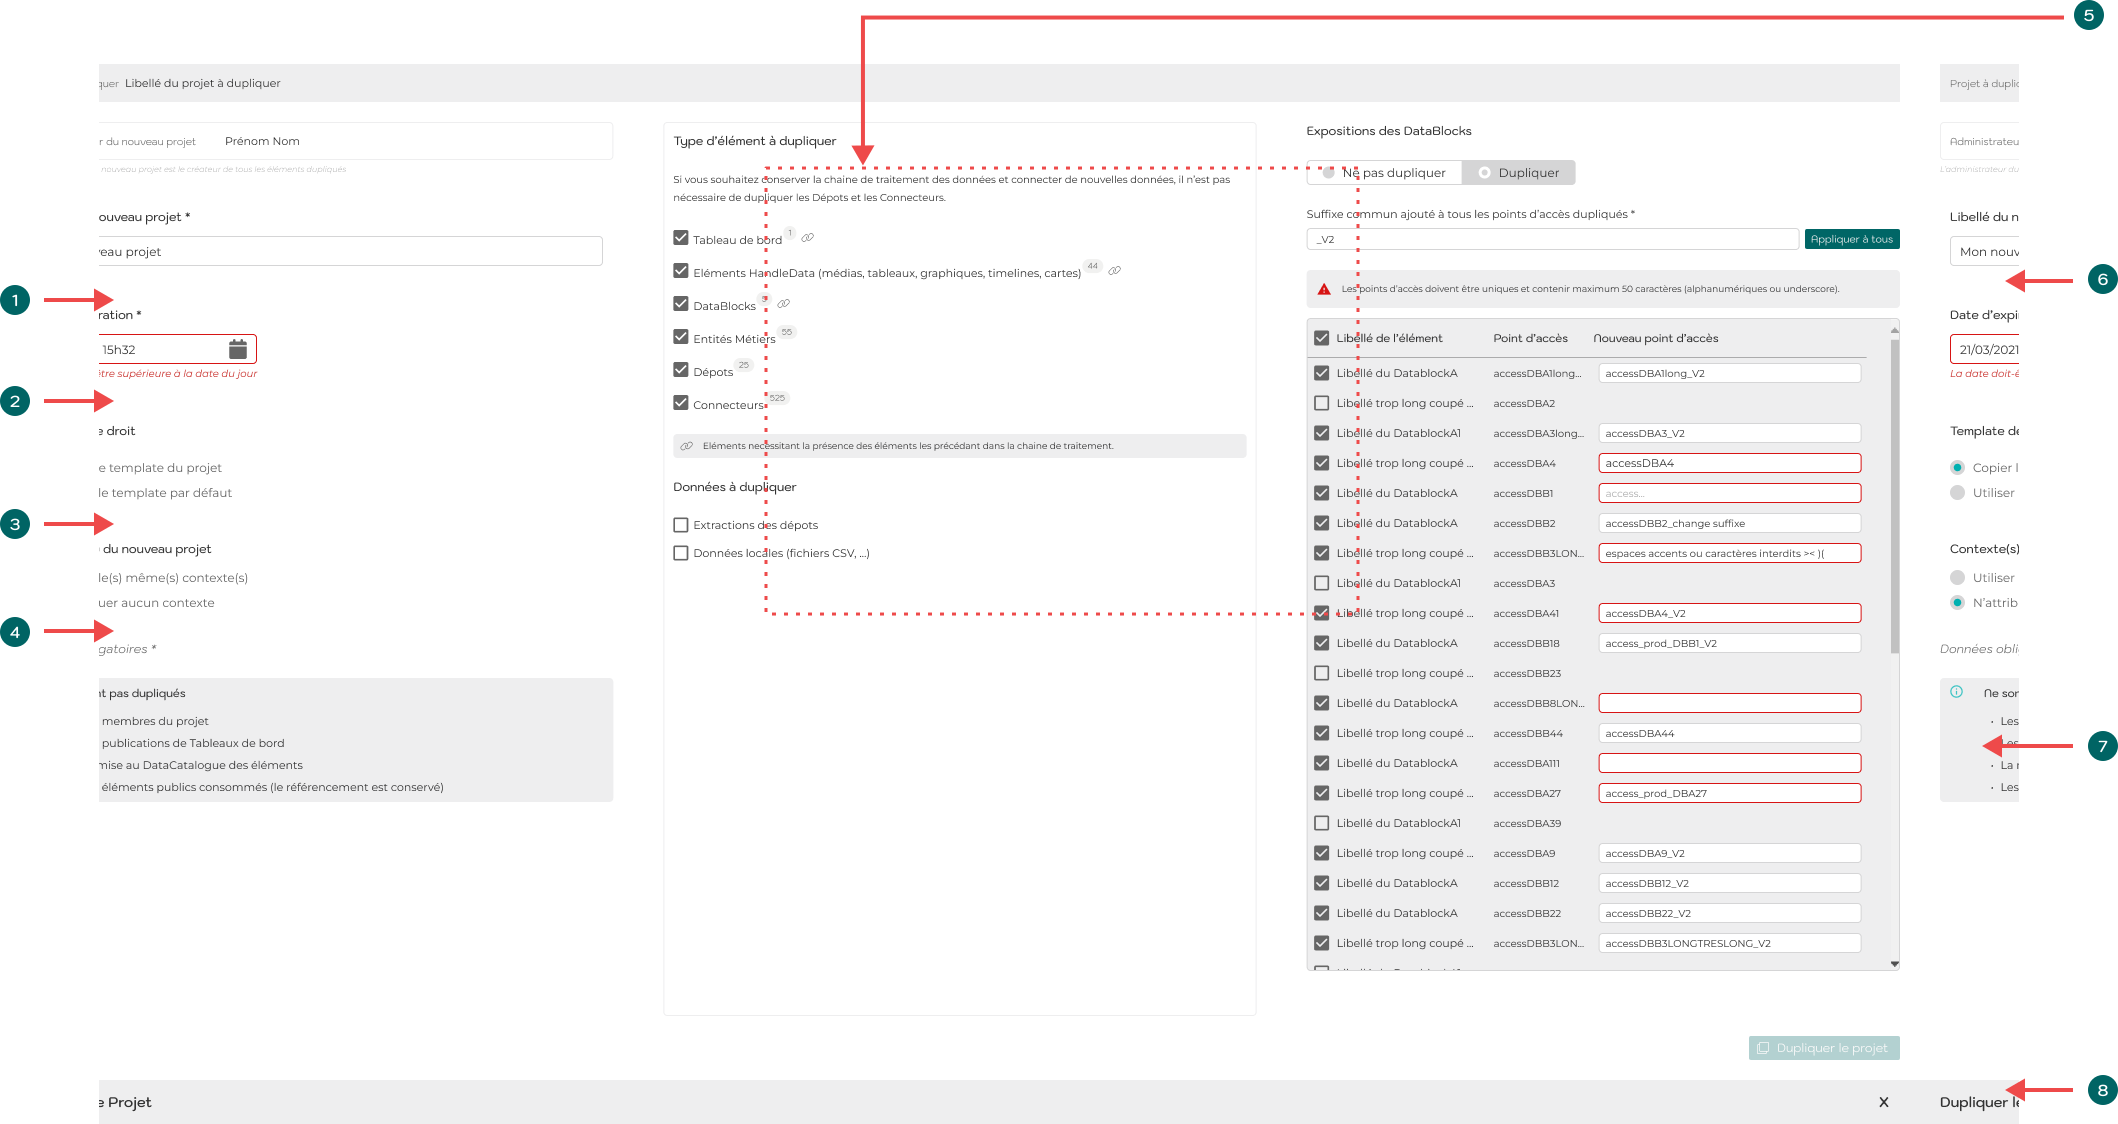
Label: editable. By default, the label is the same as that of the source project
By default, the description is identical to that of the source project. This information can be edited after the project is created
Expiration date: editable. By default, it is the current date and time + 6 months
Rights template: the selected template can in all cases be modified after duplication and before adding members to the project
Context: assigning a context is mandatory in order to duplicate the data
Element types: element types that contain no elements cannot be selected. Some elements are automatically selected or deselected depending on the selection of other element types in order to ensure that the data processing chain operates correctly.
Common suffix: as V1 DataBlock Exposures have been deprecated since DataChain version 9.2, this suffix no longer exists.
This element refers to V1 Exposures, which are now deprecated and replaced by DataAPIs
Step 3 - New project creation
Once the project has been correctly configured, click "Duplicate project". The creation process may take some time, depending on the size of the source project and the selected options. Once the project has been created, its configuration can be modified from the project page.
Delete an existing Project
If the Project has several versions, delete them individually from the Versions tab. The active version cannot be deleted while other versions exist.
See Delete a version. The procedure described below covers deletion confirmations; validation using a code received by email applies to critical Projects.
+
Only Project Managers can delete it.
An Internet connection is required to validate the deletion of critical Projects.
Deleting a Project deletes all Project elements
-
Publications
-
Dashboards
-
All Visualizations (Media, Tables, Charts, TimeLines, Maps)
-
Visualization sources
-
DataBlocks and DataAPIs (endpoints and published data)
-
DataLinks
-
Business Entities
-
Repositories and their Extractions
-
Connectors
-
Files contained in local Repositories
-
All Business Entity and Datablock persistences
-
Classifications created in the deleted Project
Step 1
From the Project list, click  at the top left.
If the Project contains elements, a window opens listing all the elements contained in the project.
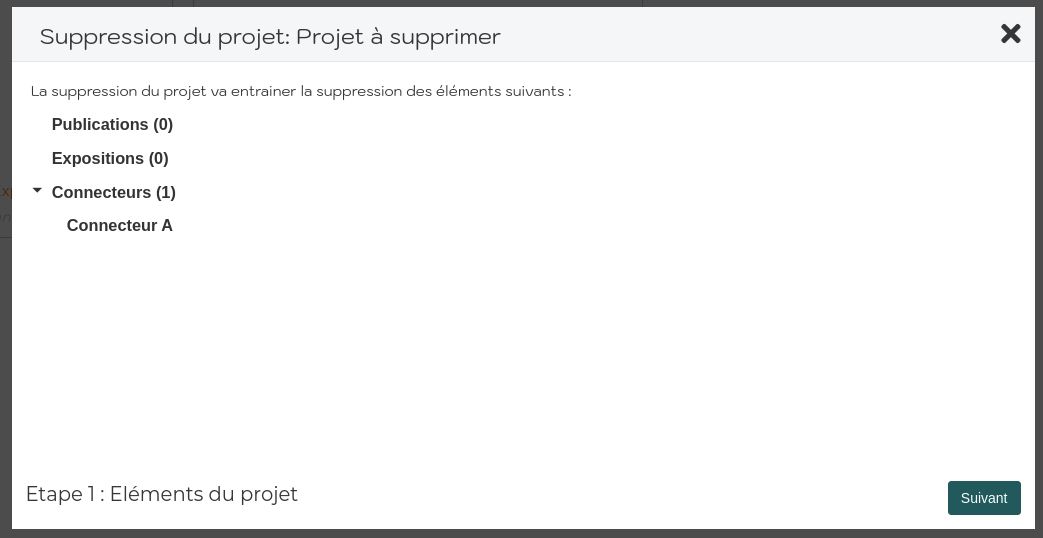
Click Next to proceed to the next step.
Step 2
A message explains all the implications of deleting the Project.
To proceed to the next step, enter the requested phrase and select the checkbox.
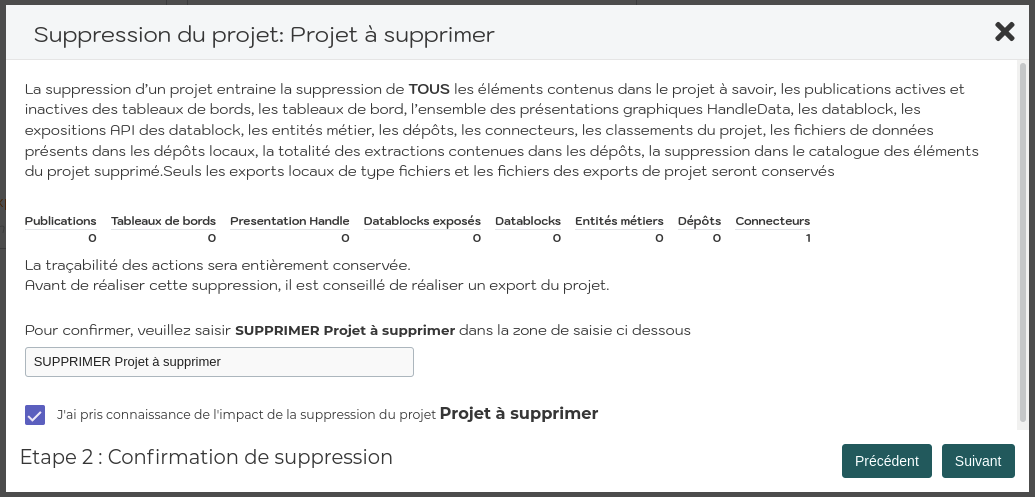
Deletion is irreversible; all elements in the project are deleted along with it.
It is recommended to export the Project before deleting it.
Click Next to proceed to the next step.
Step 3 | Critical Project
For a critical Project, an email containing a validation Token is sent to the email address of the user performing the deletion.
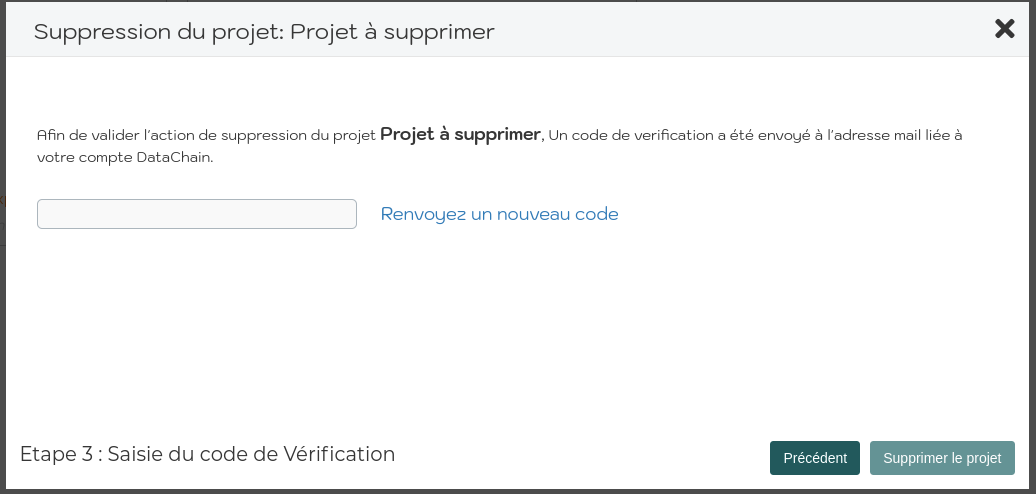
Enter the code to permanently Delete the Project.
Dernière mise à jour le 28 octobre 2026 à 18:35